
Welcome to the essential lesson on managing speed and control when cornering for your A2 motorcycle license. This topic is crucial for safe riding and frequently tested in the Dutch CBR theory exam. We'll guide you through the precise techniques for braking before a curve and using throttle control to navigate it smoothly, building on your understanding of motorcycle dynamics.

Navigating curves safely and efficiently is a fundamental skill for every motorcyclist, especially for those preparing for the Dutch Category A2 motorcycle license. This lesson delves into the crucial interplay between speed, braking, and throttle control, explaining the optimal sequence that enhances stability, preserves tyre grip, and reduces the risk of accidents. By mastering these techniques, you will develop the confidence and precision needed to handle various road conditions and curve types safely.
The ability to control your motorcycle through a turn hinges on understanding how your actions influence the bike's dynamics, particularly weight transfer and tyre traction. Incorrect timing of braking or throttle application can lead to unpredictable reactions, loss of traction, and potentially dangerous situations. This comprehensive guide will equip you with the theoretical foundation to execute smooth, controlled cornering, a core competency vital for both your practical exam and everyday riding on Dutch roads.
The forces acting on a motorcycle in a curve are complex, requiring a rider to manage multiple inputs simultaneously. Your ability to negotiate a curve safely depends heavily on precise control of your speed before entering the turn, and then maintaining stability through the turn itself. This is not just about performance; it is primarily about safety and avoiding common hazards.
Understanding the correct sequence for braking before a curve and accelerating through it directly impacts the motorcycle's stability and the available grip from its tyres. Mismanaging these inputs can lead to situations where the tyres are overwhelmed, resulting in a loss of control. Such incidents are a significant cause of motorcycle accidents on curved roads, making mastery of these techniques a top priority for safe riding.
The most critical principle for safe cornering on a motorcycle is to complete all deceleration while the motorcycle is still upright, before any significant lean angle is introduced. This is often referred to as "upright braking" or "pre-lean braking." This golden rule maximises tyre grip and stabilises the suspension, setting you up for a smooth entry into the turn.
When you brake on a motorcycle, especially using the front brake, the vehicle's weight shifts forward. This phenomenon, known as longitudinal load transfer, significantly increases the pressure on the front tyre. The increased load on the front tyre, in turn, enhances its grip, allowing it to generate more braking force. However, this optimal grip is only fully available when the tyre is primarily dedicated to braking in a straight line.
By completing your braking while the motorcycle is upright, you allow the front tyre to use its maximum available friction solely for slowing down. Attempting to brake while the motorcycle is already leaned over introduces lateral forces, which compete with the longitudinal braking forces for the tyre's limited grip. This competition can quickly overwhelm the tyre, leading to a loss of traction and a potential slide.
Effective upright braking involves both the front and rear brakes, typically with a greater emphasis on the front brake (around 70-80% of total braking force). As you apply the brakes, the momentum of the motorcycle and rider transfers weight towards the front wheel. This dynamic load transfer compresses the front suspension and extends the rear suspension.
This forward weight transfer is beneficial because the front tyre is designed to handle significant load and braking forces. It also helps to keep the motorcycle stable by preventing the rear wheel from lifting or losing traction prematurely. Understanding this dynamic is crucial for precise braking and preparing the motorcycle for the upcoming turn.
A frequent and dangerous mistake riders make is attempting to apply significant brake pressure, especially front brake, while the motorcycle is already leaned into a curve. This "late braking while leaned" is perilous because the tyre's available grip is a finite resource. When a tyre is already generating substantial lateral force to maintain a lean, it has very little remaining grip to provide longitudinal braking force.
This situation often results in the front tyre losing traction, causing a "low-side" crash where the motorcycle slides out from under the rider. Even if a crash is avoided, braking while leaned can cause the motorcycle to stand up prematurely, forcing the rider to lean more aggressively to stay on the intended line, or to run wide off the road. The Dutch traffic regulations (RVV 1990 Article 7) mandate operating a vehicle safely, and braking while leaned directly contradicts this principle.
Once your speed has been correctly reduced through upright braking, the next step is to smoothly release the brakes and initiate the lean into the curve. This is primarily achieved through counter-steering.
Counter-steering is the technique used to initiate a motorcycle's lean by briefly pushing on the handlebar in the direction opposite to the desired turn. For example, to turn right, you push on the right handlebar. This causes the front wheel to momentarily steer left, which in turn causes the motorcycle to lean to the right.
This technique is fundamental for quickly and precisely controlling the lean angle. After braking is complete, the motorcycle's suspension should be relatively settled, making it responsive to counter-steering inputs. The magnitude and duration of the counter-steer input will determine how quickly and deeply the motorcycle leans into the turn.
The transition from braking to leaning must be smooth and deliberate. As you approach your intended turn-in point (the start of the lean), gradually ease off the brakes until they are fully released. Only once the brakes are off should you initiate your counter-steering input. This sequential approach ensures that the tyres are not simultaneously tasked with braking and generating significant lateral forces.
Maintaining a finger or two on the front brake lever after release can be a good habit for experienced riders, allowing for quick, small adjustments if an unexpected hazard appears. However, any significant re-application of the brake should ideally be done only if the motorcycle can be brought back to a more upright position, if conditions allow.
Once you've entered the curve and established your lean angle, maintaining a steady and predictable state of the motorcycle is key. This is where the concept of a "maintenance throttle" comes into play.
Maintenance throttle refers to a small, consistent throttle opening (typically around 10-20% of full throttle) that is held constant as you navigate the apex of the curve. It's not about accelerating hard, but about applying just enough power to keep the drivetrain under a slight load.
This technique is sometimes also called "neutral throttle" because it aims to achieve a neutral, stable state for the motorcycle. The slight engine power being sent to the rear wheel keeps the rear tyre under positive load, which in turn compresses the rear suspension slightly.
The primary benefit of maintenance throttle is chassis stability. By keeping the rear suspension slightly compressed and under load, it prevents the "bobbing" or oscillating effect that can occur when the throttle is completely closed. When the throttle is closed, the engine braking effect can cause the rear suspension to extend, shifting weight forward and potentially unsettling the rear tyre. This can lead to a feeling of instability or even a momentary loss of rear tyre grip, especially over bumps or uneven surfaces.
Maintaining a constant, gentle throttle input ensures that the suspension remains settled, providing a more predictable and stable platform for the tyres to grip the road. This consistent load on the rear tyre also contributes to the overall traction available, which is particularly important when the motorcycle is leaned over and relying heavily on lateral grip.
Completely closing the throttle at the apex of a curve is a common mistake that can destabilise the motorcycle. As mentioned, it unloads the rear suspension, potentially reducing rear tyre grip and causing the bike to feel unstable or "fall into" the turn more aggressively than intended. In extreme cases, a sudden throttle closure can lead to rear-wheel lift, which is particularly dangerous.
Instead, strive for that smooth, small maintenance throttle. This helps you maintain control, allows for subtle adjustments to your line if needed, and prepares you for the next phase of cornering: exiting the curve with progressive acceleration.
Once you have passed the apex of the curve and the motorcycle begins to straighten up (its lean angle starts to decrease), it's time to progressively open the throttle and accelerate out of the turn. This "progressive throttle roll-on" is crucial for a smooth, stable, and efficient exit.
The timing of your throttle roll-on is critical. It should begin just after the apex, as your sight line opens up and you can see the exit of the curve. As the motorcycle naturally begins to stand up and its lean angle reduces, more of the tyre's contact patch is available for longitudinal (accelerating) forces.
The goal is to match your throttle input to the decreasing curvature of the road and the increasing straight-line component of your trajectory. This allows the motorcycle to accelerate efficiently without overwhelming the tyres' remaining lateral grip. Early and aggressive throttle application while still heavily leaned can be dangerous.
The concept of the traction circle is paramount here. While leaned, a significant portion of the tyre's grip is dedicated to maintaining the lean. If you apply too much throttle too abruptly while still heavily leaned, you demand excessive longitudinal force from the tyre while it's still generating substantial lateral force. This can exceed the traction circle limits, causing the rear tyre to lose grip and spin.
This loss of rear traction is known as "over-steer" and can lead to a "high-side" crash, where the rear tyre slides out and then suddenly regains grip, violently throwing the rider over the high side of the motorcycle. To prevent this, your throttle roll-on must be progressive, building power smoothly as the bike's lean angle decreases.
Think of it as a balance: as your lean angle reduces, your available lateral grip requirements decrease, freeing up more grip for acceleration. Conversely, as your throttle input increases, you should ideally be reducing your lean angle. This harmonious relationship allows you to seamlessly transition from cornering to acceleration, maintaining stability and control.
By progressively rolling on the throttle, you also contribute to stability by gently compressing the rear suspension, which helps the motorcycle track predictably and reduces any tendency to wobble or weave.
To truly master cornering, a deeper understanding of the physics at play is essential. Concepts like the traction circle, dynamic load transfer, and the integrated "Brake-Lean-Accelerate" sequence provide the framework for advanced control.
The traction circle is a powerful conceptual tool for understanding tyre grip. It illustrates that a tyre has a finite amount of total grip. This grip can be used for various forces: braking (longitudinal negative), acceleration (longitudinal positive), and cornering (lateral). The traction circle shows that these forces share a common limit.
If you are using 80% of a tyre's grip for lateral force (leaning), you only have 20% remaining for either braking or acceleration. Exceeding the total available grip — going outside the "circle" — will inevitably lead to a loss of traction. This is why braking while leaned is so dangerous: it attempts to add longitudinal braking force when the tyre is already heavily loaded with lateral cornering force, pushing it beyond its limits.
Understanding the traction circle helps you manage your inputs sequentially: first brake (longitudinal), then lean (lateral), then accelerate (longitudinal). This ensures you stay within the tyre's grip limits at all times.
Motorcycles are constantly experiencing shifts in weight distribution, known as dynamic load transfer.
Anticipating these load shifts allows you to use them to your advantage. For example, the forward load transfer during braking enhances front tyre grip, which is why upright braking is so effective. Conversely, the rearward load transfer during acceleration increases rear tyre grip, which you leverage during your progressive throttle roll-on out of a corner. Ignoring these dynamics can lead to overloading a single tyre, resulting in a loss of control.
Combining these principles creates the definitive mental model for safe and effective cornering: the "Brake-Lean-Accelerate" sequence.
This sequence provides a repeatable, logical framework that optimises tyre grip, suspension stability, and rider control throughout the entire curve. Deviations from this sequence, such as braking while leaned or closing the throttle mid-corner, disrupt the balance and significantly increase crash risk.
While specific cornering techniques are often best practices rather than strict laws, Dutch traffic regulations do contain overarching principles that directly apply to how you should manage your speed and control your motorcycle in curves.
The Reglement Verkeersregels en Verkeersveiligheid (RVV 1990) is the core Dutch traffic code. Two articles are particularly relevant to safe cornering:
The Rijrichtlijn (Guidelines for Motorcyclists) issued by the CBR (Centraal Bureau Rijvaardigheidsbewijzen) provides recommended best practices for safe motorcycle riding, including detailed advice on cornering. While not legislative, these guidelines are followed by instructors and examiners and reflect current best practices for the Dutch motorcycle license theory and practical tests.
Adhering to these guidelines is not only vital for passing your theory and practical exams but also for cultivating safe and responsible riding habits throughout your motorcycle career.
Failing to apply the correct cornering sequence can have severe consequences, ranging from minor incidents to serious accidents:
The ideal "Brake-Lean-Accelerate" sequence provides a solid foundation, but real-world riding demands adaptability. Various conditions require adjustments to your technique to maintain safety and control.
Wet roads, especially those with standing water, oil, or wet leaves, drastically reduce tyre traction. The traction circle shrinks significantly (by 30-50% or more).
At night or in low-light conditions, your ability to perceive the road ahead is significantly reduced. You may not spot the curve's true radius or potential hazards until much later.
Adding a passenger or heavy luggage significantly alters the motorcycle's centre of gravity (CG), typically shifting it rearward and upward.
Even with the best technique, certain situations can pose significant challenges in curves. Anticipation and correct responses are key.
A common cause of curve-related accidents is misjudging the curve's severity and entering it at an excessive speed. This forces the rider to either brake while leaned (dangerous) or run wide (dangerous).
Suddenly seeing gravel, an oil spill, or a vulnerable road user (cyclist, pedestrian) in your path while leaned can be alarming.
Issues like worn tyres, faulty brakes, or suspension problems can severely compromise your ability to corner safely.
Mastering motorcycle theory involves understanding specific terminology. Here are key terms related to braking and accelerating through curves:
Mastering the art of braking before and accelerating through curves is a cornerstone of safe and proficient motorcycle riding. By consistently applying the "Brake-Lean-Accelerate" sequence – completing all braking while upright, initiating the lean with counter-steering, maintaining a small maintenance throttle through the apex, and progressively rolling on the throttle on exit – you will enhance your control, preserve tyre grip, and significantly reduce the risks associated with cornering.
Remember that understanding the underlying physics of the traction circle and dynamic load transfer empowers you to make informed decisions. Always adapt your technique to changing conditions, such as wet roads, night riding, or carrying a passenger. Adherence to Dutch regulations like RVV 1990 Articles 5 and 7, along with the CBR's Rijrichtlijn, underscores your commitment to safety on the road. With practice and diligent application of these principles, you will develop the essential skills to navigate curves confidently and safely, setting you up for success in your CBR Theory Course for the Dutch Motorcycle License (Category A2) and beyond.
Lesson content overview
Explore all units and lessons included in this driving theory course.
Explore search topics learners often look for when studying Braking Before and Accelerating Through Curves. These topics reflect common questions about road rules, driving situations, safety guidance, and lesson level theory preparation for learners in the Netherlands.
Browse additional driving theory lessons that cover connected traffic rules, road signs, and common driving situations related to this topic. Improve your understanding of how different rules interact across everyday traffic scenarios.
Explore the critical role of dynamic load transfer in motorcycle cornering. Understand how braking, acceleration, and leaning affect weight distribution and tyre grip for safe negotiation of curves in the Netherlands.
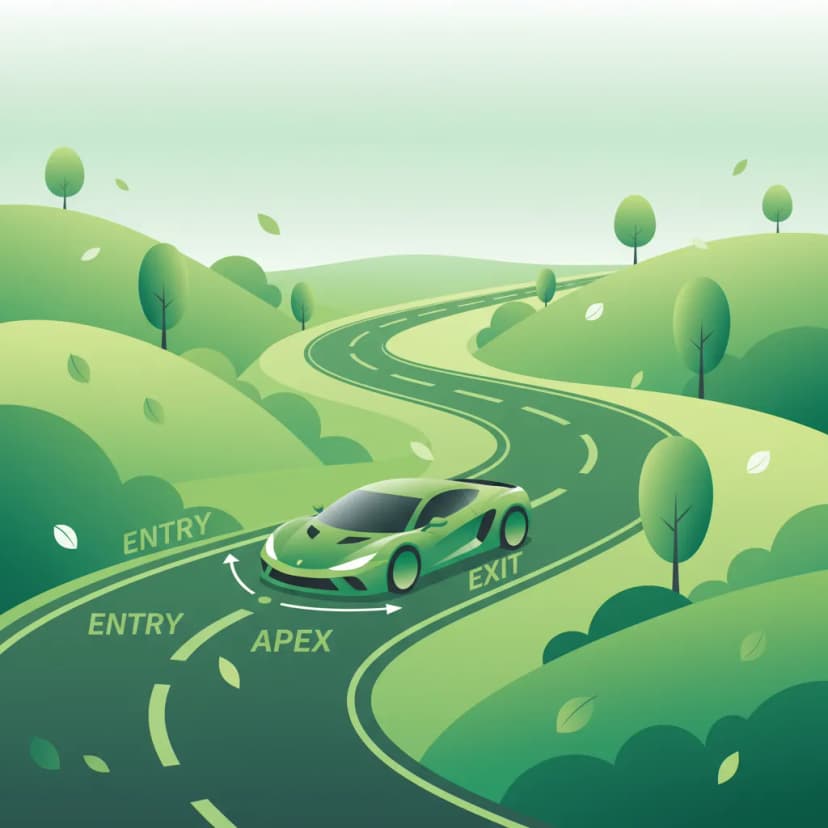
This lesson teaches a systematic approach to cornering by breaking it down into three distinct phases: entry, apex, and exit. It explains how to choose the correct road position and entry speed, identify the safest apex (not always the geometric one), and apply the throttle smoothly on exit to maximize stability and safety. This 'slow in, fast out' methodology provides a structured, repeatable process for navigating any corner with confidence and control.

This lesson addresses the specific challenge of cornering when road grip is compromised. It teaches riders how to identify potential low-traction surfaces like wet manhole covers, painted lines, gravel, or oil patches. The content focuses on techniques to mitigate risk, such as reducing speed, minimizing lean angle, and applying all control inputs—braking, steering, and throttle—with exceptional smoothness to avoid overwhelming the available grip.

This lesson explains how you, the rider, are an active part of the motorcycle's dynamics. You will learn how shifting your body weight into the turn can reduce the required lean angle of the motorcycle itself, increasing the margin of safety and grip. The content covers correct posture, the importance of looking through the turn with your head up, and how to stay relaxed on the controls to allow the bike to work effectively.

This lesson details the correct, systematic procedure for safely navigating a corner. It teaches the 'slow in, fast out' principle, where all necessary braking and downshifting is completed before entering the turn. The content covers how to choose the correct line, identify the apex, and use smooth throttle application on the exit to maintain stability and traction, ensuring a safe and controlled passage through the bend.
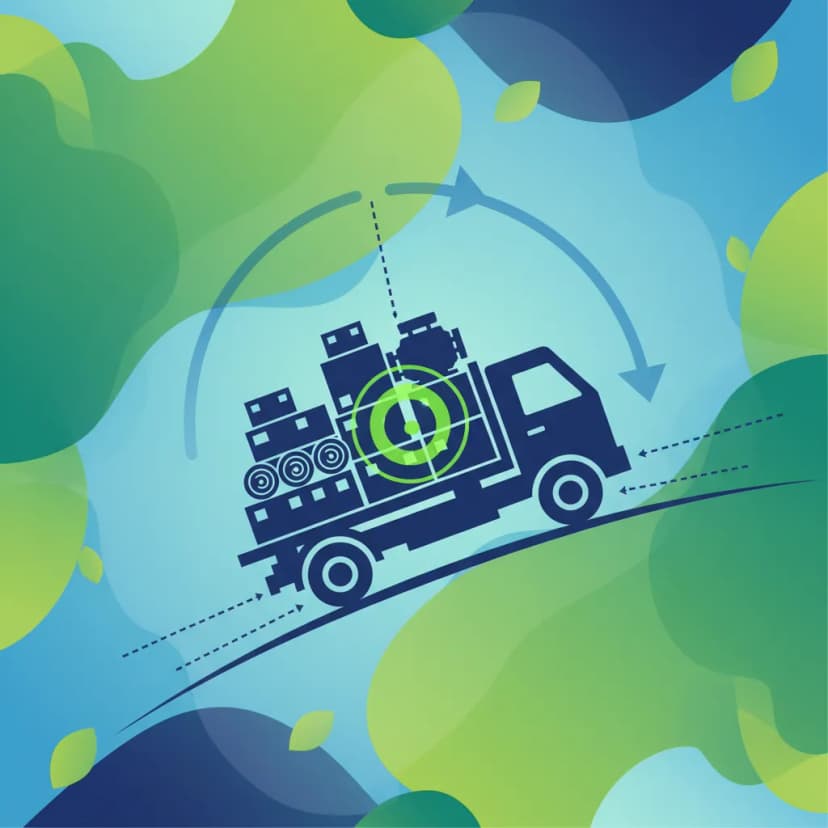
This lesson explains the physics of how weight distribution affects a motorcycle's stability. You will learn the golden rule of packing: keep the weight as low and as close to the motorcycle's center of gravity as possible. The content provides practical advice on loading panniers evenly, placing heavier items in a tank bag rather than a high top case, and respecting the manufacturer's maximum load capacity.

This lesson explains the critical role of the rider's body in controlling the motorcycle's dynamics, especially during cornering. It details how shifting body weight alters the combined center of gravity, allowing for greater cornering speed at a given lean angle or a safer lean angle for a given speed. Techniques for correct posture, footpeg weighting, and active body positioning are covered to enhance stability, maximize grip, and provide more precise control.

This lesson teaches the technique of progressive braking, which involves applying the brakes smoothly and gradually rather than abruptly. This method allows the motorcycle's weight to transfer forward in a controlled manner, compressing the front suspension and increasing the size of the front tire's contact patch. This, in turn, maximizes available grip and allows for harder, safer braking without unsettling the chassis or locking a wheel.

Proper cornering technique is vital for safety and stability on a two-wheeler. This lesson explains the physics of turning, including the concepts of lean angle and counter-steering. You will learn the importance of adjusting your speed before the turn, looking where you want to go, and maintaining a smooth throttle through the corner. These techniques help you maximize grip and maintain control, ensuring you can navigate bends safely.

This lesson focuses on how you must adapt your riding style when the motorcycle is heavily loaded. You will learn that your braking distances will be significantly longer, requiring you to increase your following distance and begin braking earlier. The content also explains that acceleration will be slower, and cornering will require smoother, more deliberate inputs to avoid upsetting the motorcycle's altered balance.

This lesson prepares you for real-world cornering challenges where conditions are not always perfect. You will learn how to identify clues that a corner may be tightening (a decreasing radius) and how to adjust your line accordingly. The content covers strategies for dealing with unexpected hazards like gravel or wet patches mid-corner and emphasizes the importance of always riding in a way that leaves you an escape route or a margin for error.
Learn how to adjust your cornering technique for various conditions including wet weather, night riding, and carrying passengers. Essential theory for safe motorcycle operation in the Netherlands.
This lesson addresses the specific challenge of cornering when road grip is compromised. It teaches riders how to identify potential low-traction surfaces like wet manhole covers, painted lines, gravel, or oil patches. The content focuses on techniques to mitigate risk, such as reducing speed, minimizing lean angle, and applying all control inputs—braking, steering, and throttle—with exceptional smoothness to avoid overwhelming the available grip.

This lesson explains the science behind reduced grip on wet surfaces and the dangerous phenomenon of hydroplaning, where a tire rides on a layer of water instead of the road. It details the critical roles of tire tread depth, tire pressure, and riding speed in maintaining contact with the asphalt. Riders will learn techniques for riding in the rain, including using exceptionally smooth control inputs and proactively reducing speed when approaching standing water.
This lesson teaches a systematic approach to cornering by breaking it down into three distinct phases: entry, apex, and exit. It explains how to choose the correct road position and entry speed, identify the safest apex (not always the geometric one), and apply the throttle smoothly on exit to maximize stability and safety. This 'slow in, fast out' methodology provides a structured, repeatable process for navigating any corner with confidence and control.
This lesson details the correct, systematic procedure for safely navigating a corner. It teaches the 'slow in, fast out' principle, where all necessary braking and downshifting is completed before entering the turn. The content covers how to choose the correct line, identify the apex, and use smooth throttle application on the exit to maintain stability and traction, ensuring a safe and controlled passage through the bend.

This lesson explains the physics of why wet roads offer significantly less traction than dry ones, highlighting particular hazards like the first rain after a dry spell. It defines aquaplaning (when a tire rides on a layer of water instead of the road) and explains how speed and tire condition contribute to this dangerous phenomenon. The content provides clear strategies for riding in the rain, including reducing speed and applying all controls with extra smoothness.

Riding on two wheels requires special care on surfaces with reduced grip. This lesson teaches you how to handle challenging conditions like rain, ice, wet leaves, or tram tracks. Key principles include reducing speed significantly, making all control inputs (braking, accelerating, steering) much more smoothly and gradually, and increasing your following distance to allow for much longer stopping distances. Recognizing potentially slippery areas is a critical part of proactive hazard perception.

This lesson provides a detailed guide to riding in wet and low-visibility conditions. You will learn to make all your control inputs—braking, accelerating, and steering—exceptionally smooth to avoid breaking traction on slippery surfaces. The content covers the dangers of painted lines and manhole covers when wet, and the importance of increasing your following distance dramatically to account for longer braking distances.

Rain significantly reduces tire grip and rider visibility. This lesson covers the essential adjustments needed for wet-weather riding, including reducing speed, increasing following distance, and applying all controls more smoothly. It explains the danger of hydroplaning (aquaplaning) when tires lose contact with the road over standing water and how to avoid it. You will also learn about the importance of good tire tread depth for channeling water away and maintaining traction.
Proper cornering technique is vital for safety and stability on a two-wheeler. This lesson explains the physics of turning, including the concepts of lean angle and counter-steering. You will learn the importance of adjusting your speed before the turn, looking where you want to go, and maintaining a smooth throttle through the corner. These techniques help you maximize grip and maintain control, ensuring you can navigate bends safely.
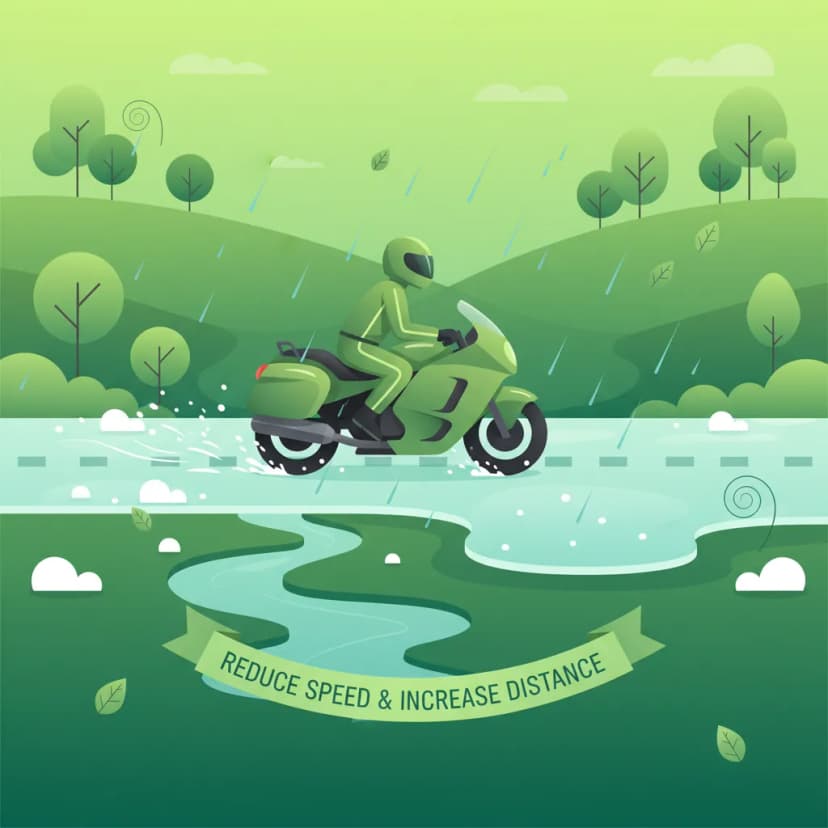
This lesson provides survival strategies for riding in the most challenging weather conditions, including heavy rain, snow, and potential ice. It emphasizes the importance of mental preparation, drastically reduced speeds, and hyper-smooth inputs for throttle, brakes, and steering. The content also covers identifying high-risk areas for 'black ice,' such as bridges and shaded spots, and the critical role of appropriate waterproof and insulated gear in preventing hypothermia and maintaining concentration.
Find clear answers to common questions learners have about Braking Before and Accelerating Through Curves. Learn how the lesson is structured, which driving theory objectives it supports, and how it fits into the overall learning path of units and curriculum progression in the Netherlands. These explanations help you understand key concepts, lesson flow, and exam focused study goals.
Braking while the motorcycle is upright is much more effective and stable. Braking while leaning can upset the balance, reduce tyre grip, and potentially lead to a skid or loss of control. Completing your braking beforehand allows you to focus on leaning and cornering.
This means applying just enough throttle to keep the engine from decelerating, but not enough to significantly increase speed. It helps to settle the suspension, maintain traction, and provide a stable platform during the most critical part of the lean.
You should begin to smoothly roll on the throttle as you start to unwind the handlebars and the motorcycle begins to straighten. This gradual application of power helps to lift the bike, maintain traction, and accelerate you out of the corner efficiently and safely.
The CBR theory exam will present scenarios where understanding correct braking and throttle application in curves is key to selecting the right answer. Questions often test your knowledge of stability, speed management, and safe motorcycle control during cornering.
If you suddenly need to brake in a curve, try to do so as gently and upright as possible. Prioritize reducing speed without upsetting the bike's balance. This is precisely why learning to brake effectively *before* the curve is so critical – it minimizes the need for emergency braking while leaned.